
.png)
How To Add Fonts To Shopify?
Customizing your Shopify store with unique fonts can significantly impact its look and feel, setting your brand apart from the competition. Whether you're aiming for a sleek, modern vibe or a cozy, vintage atmosphere, the right font can convey your brand's personality before a customer reads a single word. This blog will guide you through the straightforward process of adding new fonts to your Shopify store. From selecting the perfect typeface to implementing it on your site, we'll cover all the steps to refresh your store's aesthetic and enhance the overall shopping experience. Let's dive into how you can elevate your Shopify store's design with custom fonts.
How to add Fonts to Shopify?
Adding custom fonts to your Shopify store can give it a unique look that aligns with your brand identity. Here's a practical, step-by-step guide on how to do it:
- Choose Your Font: First, select the font you want to use. If it's not available in Shopify's font library, you can find free or paid fonts from online font libraries like Google Fonts or Adobe Fonts.
- Download the Font Files: Once you've chosen your font, download the font files. Ensure you have the correct file format (.woff, .woff2, .ttf, or .otf) that's compatible with web use.
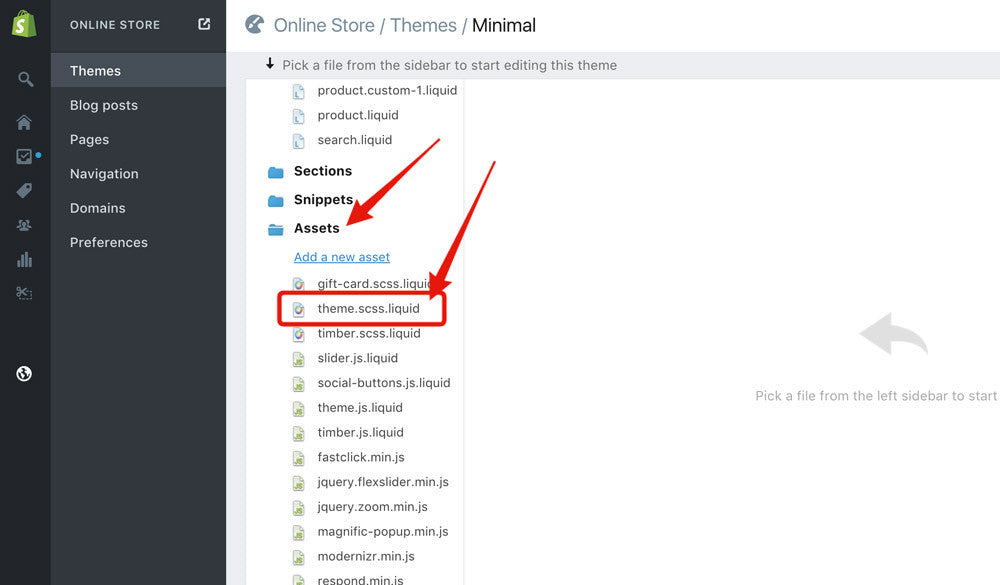
- Upload Font Files to Shopify: Access your Shopify Admin, go to 'Settings', then 'Files', and upload your font files. Remember the URL given to the files after uploading; you'll need it.
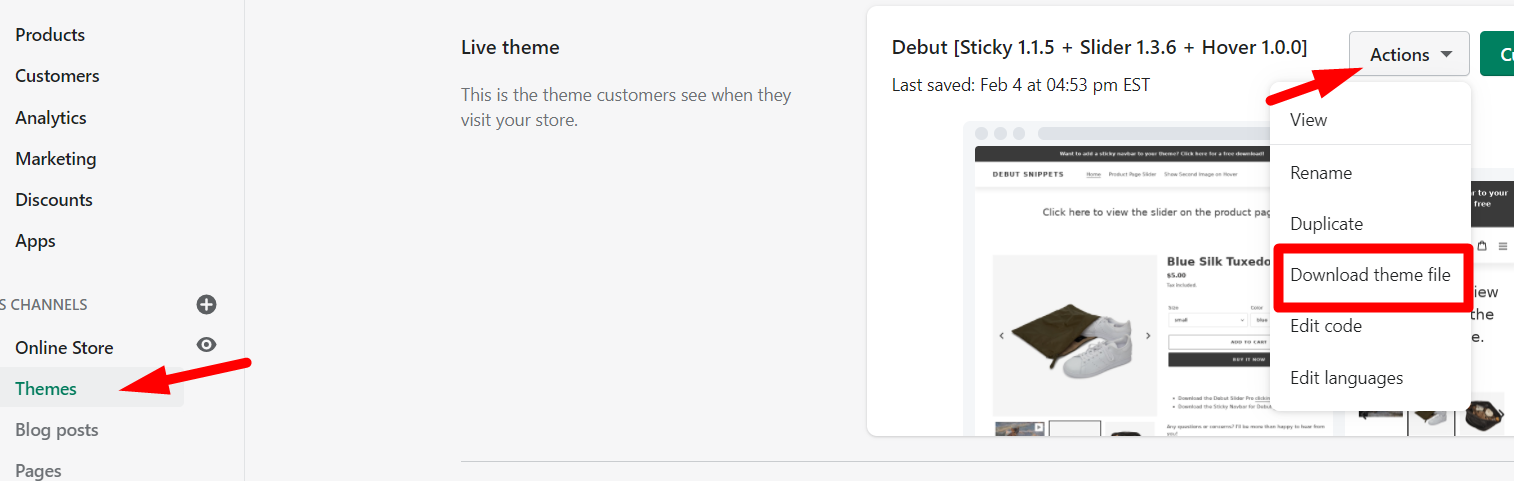
- Update Your Theme's CSS: Navigate to 'Online Store' > 'Themes'. Click on 'Actions' > 'Edit code'. Find your theme's CSS file (usually theme.scss.liquid or styles.scss.liquid). Add the following code snippet at the top of the file, replacing YourFontName with the name of your font and URL with the URL of the uploaded font file:
@font-face{font-family: 'YourFontName';src: url('URL') format('woff2'),url('URL') format('woff');font-weight: normal;font-style: normal;
}
Apply the Font: Still in the theme's CSS file, apply the font to the desired elements. For example, to change the font for all paragraphs, add:cssCopy codep { font-family: 'YourFontName', sans-serif;
}
- Save Your Changes: After editing the CSS, save your changes. It's a good idea to preview your store to ensure the font displays correctly across different elements.
Shopify Product Tags: How They Transform Your Online Store's Navigation
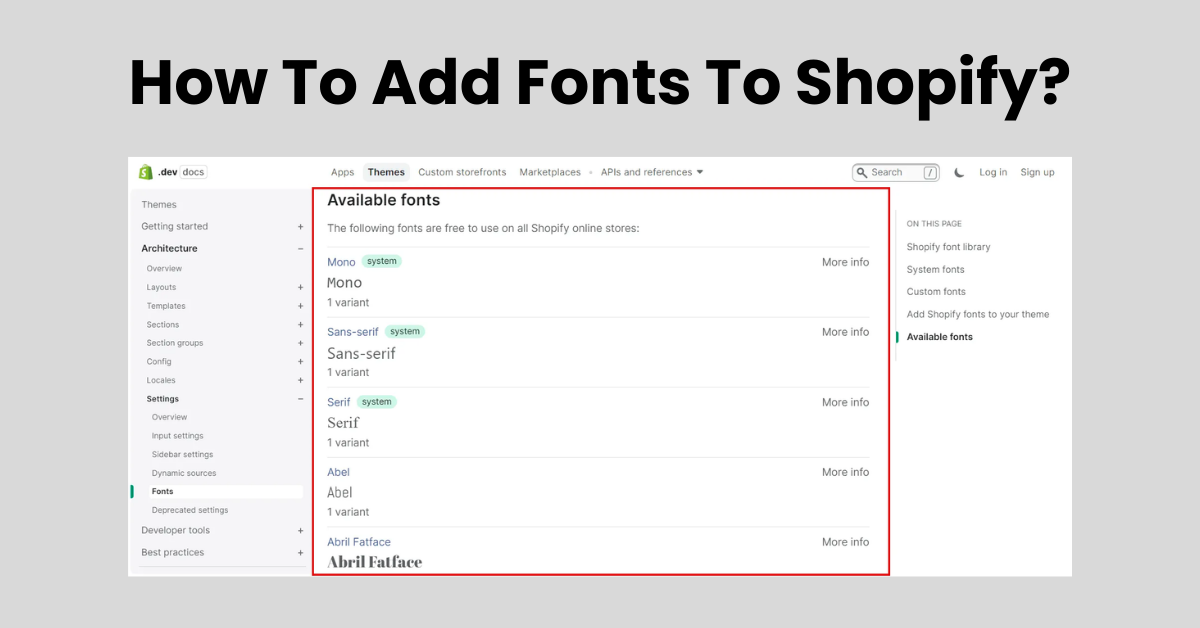
How to find fonts on Shopify?
Finding fonts on Shopify is a straightforward process, allowing you to customize your store's look to match your brand. Here’s how you can explore and select fonts directly within Shopify:
- Access the Theme Editor: Log in to your Shopify Admin panel. Navigate to 'Online Store' and then 'Themes'. Find the theme you want to customize and click 'Customize'.
- Theme Settings: In the theme editor, select 'Theme settings' at the bottom of the sidebar. This section allows you to adjust the overall look of your theme.
- Typography Settings: Within 'Theme settings', find and click on 'Typography'. This section displays all the font options available for your theme.
- Browse and Preview Fonts: You'll see a list of fonts currently used by your theme along with options to change them. Click on any font selection to open the font picker, where you can browse through available fonts. Shopify themes typically offer a selection of fonts from Shopify's font library, including options for headings, body text, and buttons.
- Preview Changes: As you select different fonts, your theme editor will preview those changes in real-time. Use this feature to see how each font looks on your site.
- Save Your Selection: Once you've found a font that fits your brand's style, click 'Save' to apply the changes to your store.
How to add custom fonts to Shopify?
Adding custom fonts to your Shopify store involves a few straightforward steps to personalize and enhance your site's design. Here’s how you can do it:
- Select Your Font: Choose a custom font that suits your brand. You can use fonts from various online libraries like Google Fonts.
- Download the Font: After selecting your font, download the font files to your computer. Ensure you have the web-friendly versions (.woff or .woff2).
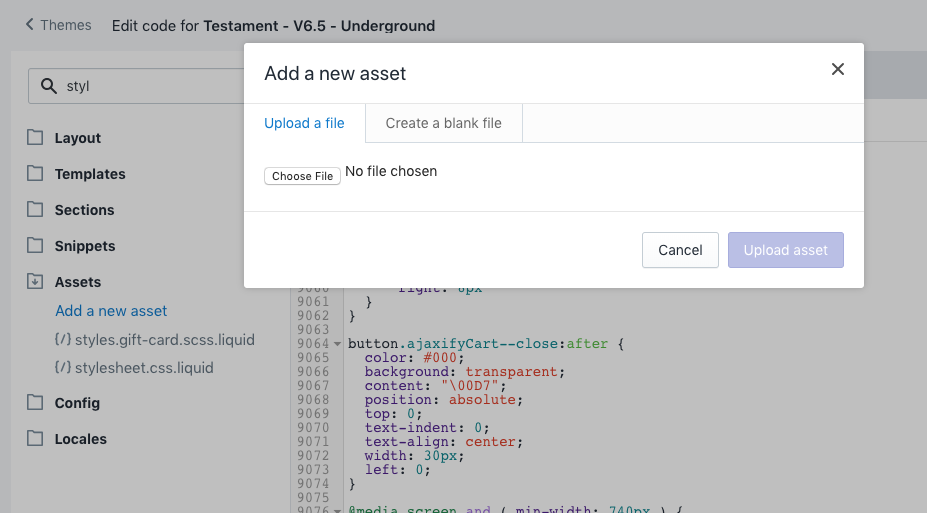
- Upload the Font to Shopify: Log in to your Shopify admin panel, go to 'Settings' > 'Files', and upload your downloaded font files. Note the URL provided after uploading, as you'll need it for the next step.
- Edit Your Theme's CSS: Access 'Online Store' > 'Themes'. Click 'Actions' > 'Edit code'. Find the
assetsfolder and open your CSS file (often namedtheme.scss.liquidor similar). Add an@font-facedeclaration at the top of this file, specifying your font name and the URL(s) from the previous step, like so:
@font-face {
font-family: 'Your Custom Font';
src: url('{{ 'your-font-file-name.woff2' | asset_url }}') format('woff2'),
url('{{ 'your-font-file-name.woff' | asset_url }}') format('woff');
} - Apply the Font in Your CSS: Use the
font-familyproperty to apply your custom font to the desired elements on your site, for example:
body, h1, h2, h3 {
font-family: 'Your Custom Font', sans-serif;
} - Preview and Save: Preview your theme to ensure the font is applied correctly, then save your changes.
Shopify Metafields: The Hidden Gem for E-Commerce Stores
How to add google fonts to Shopify?
Adding Google Fonts to your Shopify store is a straightforward process that can significantly enhance the visual appeal of your site. Here's how to do it:
- Select Your Font: Visit the Google Fonts website and choose a font you'd like to use on your Shopify store. Click on the font and select the styles you need.
- Get the Embed Code: Once you've selected the font and its styles, Google Fonts will provide an embed code. Copy this code.
- Access Your Shopify Admin: Log in to your Shopify admin dashboard and navigate to 'Online Store' > 'Themes'.
- Edit Your Theme Code: Find the theme you want to modify and click on 'Actions' > 'Edit code'. Look for the
theme.liquidfile under the 'Layout' section. - Paste the Embed Code: In the
theme.liquidfile, find the<head>tag and paste the Google Fonts embed code just before the closing</head>tag. - Update CSS: To apply the font, you'll need to update your CSS. Find your CSS file (usually
theme.scss.liquidor similar) in the 'Assets' section. Add CSS rules to apply the font to the desired elements, e.g.,body { font-family: 'Your Google Font Name', sans-serif; }. - Save Changes: After adding the code, save your changes and preview your store to see the new font in action.
Grow your Shopify Store with Manifest AI

Growing your Shopify store with Manifest AI means integrating a powerful tool that uses artificial intelligence to enhance the way your store interacts with customers. This platform analyzes customer data to deliver a personalized shopping experience and insightful analytics, helping you make smarter business decisions.
Benefits include:
- Tailored Customer Experiences: By understanding individual customer preferences and behaviors, Manifest AI can present personalized product recommendations, significantly improving the likelihood of purchases.
- Streamlined Customer Support: The platform can handle a wide range of customer queries automatically, ensuring fast and efficient responses that boost customer satisfaction.
- Data-Driven Decision Making: With access to detailed analytics on customer interactions and preferences, you can optimize your marketing strategies and product offerings to better meet customer needs.
- Increased Sales and Conversion Rates: Personalized experiences and efficient customer support contribute to higher conversion rates and repeat business, driving sales growth.
- Operational Efficiency: Automating routine tasks like customer inquiries and data analysis frees up your time to focus on strategic growth initiatives.
- Enhanced Customer Loyalty: Providing a personalized and efficient shopping experience encourages customers to return, fostering loyalty and long-term relationships.
How to change font on Shopify?
Changing the font on your Shopify store is a straightforward process that can significantly impact your site's appearance and user experience. Here's how to do it in a few simple steps:
- Access Your Shopify Admin: Log in to your Shopify admin panel.
- Navigate to the Theme Editor: Click on ‘Online Store’ and then ‘Themes’. Find the theme you want to edit and click on ‘Customize’.
- Open Theme Settings: In the theme editor, click on ‘Theme settings’ or ‘Typography’, depending on your theme’s layout.
- Choose Your Font: Here, you’ll see options for changing the fonts used on your site. Shopify themes typically allow you to change fonts for the body text and headings. Click on the font dropdown menu and select the font you wish to use. Shopify offers a range of fonts, or you can upload custom fonts if your theme supports it.
- Save Changes: Once you’ve selected your new font, click ‘Save’ to apply the changes to your store.
Conclusion
Customizing the font on your Shopify store is a simple yet effective way to enhance its visual appeal and align it more closely with your brand identity. By following the steps outlined, you can easily change the default fonts to something that resonates more with your aesthetic preferences and brand values. Whether you choose from Shopify's font library or upload a custom font, the process is designed to be user-friendly. Remember, the key to a successful update is ensuring compatibility across different devices and browsers, so always preview your changes. With your new fonts in place, your store will have a refreshed look that can improve visitor engagement.